The following tutorial shows how you manually configure devices with an internal cellular modem to use access via mobile networks (WWAN). First you either create a mobile profile for your provider or edit an existing profile, and then you assign this profile to the WAN interface of the device.
- In LANconfig, open the configuration dialog for your device and navigate to the section Interfaces > WAN.
-
Select an existing profile to be edited or add a new profile for your provider in the Mobile profiles table.
In the interests of completeness this tutorial explains the creation of a new profile.
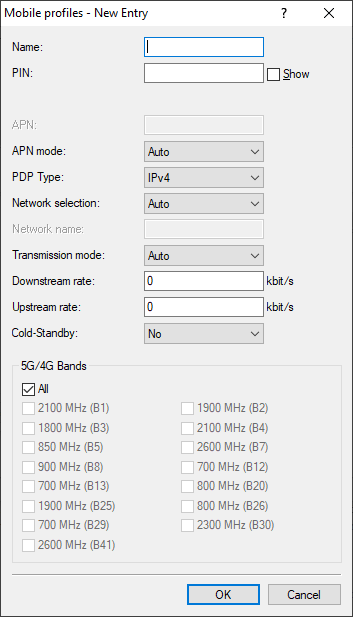
- Under Name, enter the same name as the remote station for the mobile profile.
-
Under PIN enter the 4-digit PIN of the mobile phone SIM card. The device needs this information to operate the mobile modem.
Important: The SIM card logs every failed attempt with an incorrect PIN. The number of failed attempts remains stored even when the device is temporarily disconnected from the mains. After 3 failed attempts, the SIM card is locked from further access attempts. If this occurs, you usually need the 8-digit PUK or SuperPIN to unlock it.
-
If your device accommodates several SIM cards, use SIM slot to select the SIM card that you want to associate with this profile.
The item Profile disabled switches this mobile profile off. This option is useful if you wish to create a profile template only and complete the mobile setup at a later time.
Note: Only enabled profiles are visible for selection in LANmonitor. -
Under APN, enter the name of the access server for the data services of your mobile provider.
The APN (access point name) is specific to each mobile phone provider. You will usually find this information in the documentation provided with your mobile phone contract.
- Specify under Authentication whether authentication is required for logging in to the APN. Possible values: None, PAP, CHAP.
- If necessary, enter the APN login credentials under User name and Password.
-
Under PDP type you specify the type of the PDP context for the mobile profile.
The PDP context describes the support of the address spaces which the backbone of the corresponding cellular network provider offers for connections from the cellular network to the Internet. This can be either IPv4 or IPv6 alone, or can include support for both address spaces (dual stack). Clients that want to use the corresponding cellular network provider must support at least one of the specified address spaces.
-
Set the preferred Network selection mode:
- Automatic
- The cellular modem automatically logs into the mobile network that it last used successfully. If the device fails to login, the mobile interface automatically logs in to the home network (HPLMN) stored on the SIM card.
- If the cellular modem is also unable to login to the home network stored on the SIM card, a PLMN list of preferred roaming partners on the SIM card is processed in sequence with attempted logins. The mobile interface then connects to the first available cellular network, regardless of the signal quality.
- If none of the above networks is available, one of the available PLMN networks with a "good" signal quality is selected at random: Failing this, the PLMN networks with a sufficient signal quality are processed, in the descending order of signal quality.
- As soon as the login process succeeds, the network will be used. There is no change of network unless a loss of connection occurs. The provider can however trigger a change of the cell and the access mode, if it considers this to be appropriate.
- Manual
- The cellular modem connects to the mobile phone network specified under Network name only.
-
Note: Manual mobile network selection is especially suitable when the device is in stationary operation and you wish to prevent it from connecting to another undesirable or more expensive mobile phone network.Important: If the manually set mobile network is not available, no connection will be established because the cellular modem only ever logs in to the manually specified network.
- With the setting Manual and the field Network name empty, following a scan, the CLI command do /Status/Modem-Mobile/Scan-Networks -senters the best network found into the field Network Name.
- Semi automatic
- With this method, the cellular modem initially logs in to the mobile network that is entered into the field Network Name. If the device fails to login, the cellular modem logs on to the home network (HPLMN) stored on the SIM card.
- If the HPLMN is not available, then a method analogous to automatic network selection is used, whereby the device attempts to connect to the "operator controlled PLMN selector" (roaming partner), a randomly chosen good network, or the best weak network (in that order).
- By quality
- Using a scan manually initiated in LANmonitor or from the command line, the cellular modem searches for all available cellular networks and logs into the one with the best signal quality. If this login process fails, the cellular interface uses the semi-automatic network selection.
- CLI commands
- do /Status/Modem-Mobile/Scan-Networks -s -f
- This command initially disconnects any existing cellular WAN connection, it then performs an extended scan and the best network is selected and stored to the configuration.
- This command is available in combination with semi-automatic and manual network selection. The stored network is also valid after restarting the device (cold/warm boot) until “Scan-Networks -s / -e” is executed, for all modes except automatic. The results of the scan can be viewed under Status > Modem-Mobile > Network-List.
- do /Status/Modem-Mobile/Scan-Networks -e -f
- This command initially disconnects any existing cellular WAN connection and it then performs an extended scan. The parameter -e ensures that the best network found is used, but it is not entered into the configuration. However, the entry is made in the status tree.
- do /Status/Modem-Mobile/Scan-Networks -s
- This command performs a network scan only when the WWAN connection is inactive.
- Note:
A manual scan can be performed on a regular basis and automatically by making an entry in the cron table on the LANCOM router. Enter the command
do /Status/Modem-Mobile/Scan-Networks -s -finto the configuration dialog.
- LANmonitor
- In LANmonitor, you perform the scans mentioned above by right-clicking with the mouse on the Network list and selecting the desired operation from the context menu. The scanning method Disconnect and use best network is the most effective.
- If you have selected manual network selection, enter the exact name of your desired network under Network name.
-
Specify the preferred transfer mode within the mobile network under Transmission mode:
- Automatic
- Automatic selection of transmission mode
- LTE(4G)+UMTS(3G)
- Combined LTE-UMTS operation
- LTE(4G)+GPRS(2G)
- Combined LTE-GPRS operation
- LTE(4G)
- LTE operation only
- UMTS(3G)+GPRS(2G)
- Combined UMTS-GPRS operation
- UMTS(3G)
- UMTS operation only
- GPRS(2G)
- GPRS operation only
-
Under Downstream rate and Upstream rate you specify the transfer rates for the mobile phone connection. This is important for the QoS (quality-of-service) feature and the functioning of the firewall.
If the value is set to 0, the mobile interface in the corresponding direction is considered to be unlimited and the QoS mechanisms will not take effect.
- Under Cold-Standby, specify whether the cellular modem should be logged into the cellular network in the non-backup case. If "Yes" is selected, the cellular modem is not logged into the cellular network in the non-backup case. In the backup case, it takes correspondingly longer for the module to establish a complete backup connection. This function is only supported in connection with the use of the backup table. This function has no effect or is not possible when using administrative distances, because there the WWAN modem has always established an active data connection. Default: No.
-
If unfavorable environmental conditions cause the router to constantly switch between two frequency bands, instabilities in the transmission may be the result. The selection under LTE bands allows you to control which frequency bands are used by the mobile modem.
- All
- All frequency bands are enabled.
- 2100 MHz (B1)
- 2.1GHz band is enabled.
- 1800 MHz (B3)
- 1.8GHz band is enabled.
- 2600 MHz (B7)
- 2.6GHz band is enabled.
- 900 MHz (B8)
- 900MHz band is enabled.
- 800 MHz (B20)
- 800MHz band is enabled.
Note: This option applies only to the LTE standard frequency bands. All bands can be used for UMTS and GPRS. - Click OK to save the settings.
- In the dialog Interfaces > WAN, click Interface settings and select V.24/Mobile.
- Set the V.24/Mobile interface to Mobile.
-
Under Mobile profiles, select the profile you created earlier for your mobile phone provider.
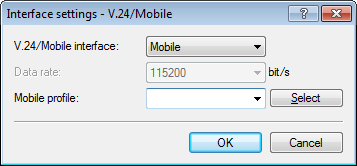
- Click OK to save the settings.
-
In the view Communication > Remote sites, click Rem. (Mobile /...) and add a new profile.
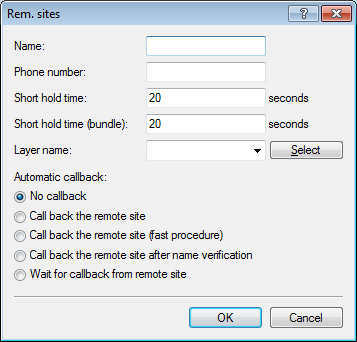
- Under Name, enter the same name as the mobile profile.
- Under Phone number, enter the dial-in number of your mobile phone provider. If your provider has not given you a dial-in phone number, enter *99#.
-
Under Short hold time, enter the time after which the device disconnects from the remote site if no packets are transmitted
Enter a value in seconds to find a balance between the costs arising from idle time those of connection establishment, for example 300. A value of 0 causes the device to stay connected until it is broken and terminated. With a value of 9999 the device automatically reconnects every time.
- For Layer name select the presetting WWAN.
- Click OK to save the settings.
-
In the view IP Router > Routing, click IPv4 routing table and add the Default route (255.255.255.255).
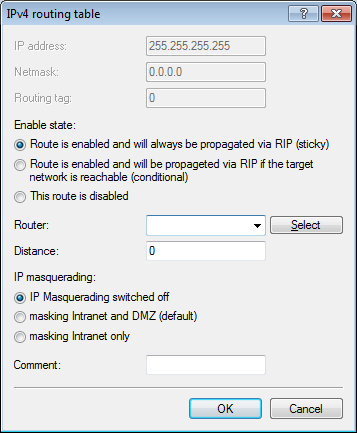
- Under Router, select the profile created earlier under Rem. sites (Mobile /...).
- Set the IP masquerading to Masking intranet and DMZ (default).
- Click OK to save the settings.
- Write the changes back to the device.