Configuring the APs

The following instructions describe how to configure the AutoWDS of an AP for preconfigured integration. The configuration steps are identical for all unassociated APs.

Note: There is no need to configure an AP that is already paired with a WLC. If devices are out of range of the WLC, thus making pairing impossible, then the SSID and passphrase can optionally be entered manually.
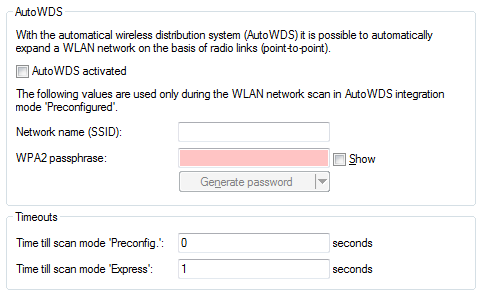
  1. Open the configuration dialog in LANconfig and click on Wireless LAN > AutoWDS to access the AutoWDS dialog.


  2. Click on AutoWDS activated to enable the feature on the device.
  3. Under Network name (SSID) enter the name of the AutoWDS base network that you configured on the WLC (e.g. AutoWDS-Rollout).
  4. Enter the key for the AutoWDS base network under WPA2 passphrase that you have configured on the WLC (e.g. AutoWDS-Control).
  5. Change the timeout values for the Time till search mode 'Preconfig' to 1 and for the Time until search mode 'Express' to 0.
  6. Under Wireless LAN > General > Physical WLAN settings. make sure that at least one physical WLAN interface is in Managed mode.
    Otherwise the device will never search for an AutoWDS base network.
  7. Close the dialog window with OK and save the configuration to the device.
After a successful configuration update, the AP switches its physical WLAN interface(s) into client mode and searches for the specified AutoWDS base network. To learn more about the procedure, refer to the chapter about the function.

www.lancom-systems.com

LANCOM Systems GmbH | A Rohde & Schwarz Company | Adenauerstr. 20/B2 | 52146 Wuerselen | Germany | E‑Mail info@lancom.de

LANCOM Logo